|
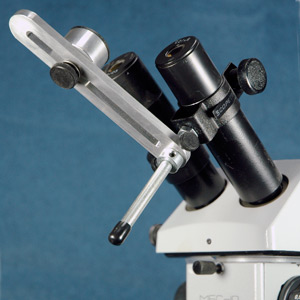
There is another possible solution. The ocular lens can be used in-line with the camera's lens to produce nice images. An adapter can be built or purchased that holds the lenses in alignment. I built several before I ended up buying a couple. The adapters I ended up purchasing were designed for telescope use, but they work fine on microscopes. Again these adapters were created by ScopeTronix but one apparently has been discontinued by the parent company. The older adapter in called the EZ Pix Universal and is shown in the first two photos. A very simple mechanism that can be positioned to hold just about any digital camera on the microscope. I have used it successfully for years. Originally the cost was about $35. Although it no longer can be found on the ScopeTronix WEB page, it is still available form other dealers. I found it at shutan.com (on site: telescope accessories/digital camera adapes) for about $50. |
||
 |
 |
A variation of this adapter can be found at Orion Telescopes. It is under their camera adapter section and is called the SteadyPix Universal Camera Mount.
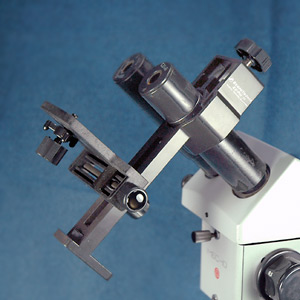
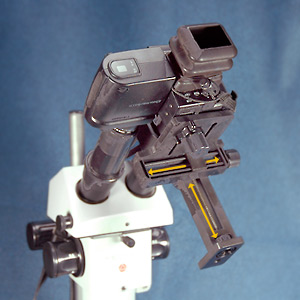
FInd them at Orion Telescopes. Their adapter can be found at this link. (9/17/2007). The adapter has a price of $37. A newer version of the original EZ pix has been released y ScopeTronix and is called the EZ Pix II. It is sown in the second set of photos attached to the microscope and attached with the Coolpix camera, It uses a pressure ring to attach to a lens barrel (like the EZ Pix Universal) but then employs a cross screw mechanism to position the camera. Two adjustable screws are mounted below the platform that holds the camera and be positioned with great accuracy. Micro adjustments are very easy with this mechanism, but if you use more than one camera body the adjustments can be slow as turning the screw takes time for larger movements. both systems work about equally well with my scope. The EZ Pix II is more rigid and bit more expensive. It can be found at ScopeTronix (look at Digital Camera Adapeters) for about $100. |
|
EZ PIX Universal Adapter
|
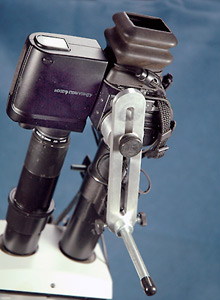
Universal with Nikon 4500
|
|
 |
 |
|
|
EZ PIX II Adapter
|
EZ PIX II with Nikon 4500
|
|
| A similar device called the Celestron Digital Camera Adapter can be found at telescopes.com. Look under Digital Imaging on their site. The cost in $50 at this WEB site. | ||
| While using the Nikon Coolpix camera with either of these mounting systems I use both the AC Adapter and the Nikon Remote control. Once I align the camera optics to the ocular microscope optics, I use the LCD viewer on the camera to see the scope image. I zoom the Coolpix lens in until the field of view becomes continuous, I set the exposure on Aperture and set the f-stop to about f/8. (Depending on the zoom level the camera gives fractional f-stops.) I use the remote control as a "half-shutter" press to freeze the auto focus, then move the microscope controls until the image is focused the way I want it. I then finish pressing the remote and expose the image.
After viewing a few images on the computer screen I sometimes go back and adjust the Exposure Compensation on the Coolpix camera if all the images appear either light or dark. I cannot use the camera LCD screen to judge this to my satisfaction. I have also used the Manual Focus in the Coolpix 4500 to freeze out the auto focus mechanism. Since I use the Nikon Remote to trip the shutter, I have fund it more efficient just to use the remote shutter button to freeze focus with the "half-press" in most cases. Either way works, it just depends on your requirements. If I were using the Coolpix self timer, then I would use the manual focus. |
||