
![]()


|
|
||||
|
|
||||
|
|
|
|||
|
Taking Photographs of
Minerals and Gemstones |
||
|
When I first began this WEB site in late 1994 and early 1995 I was interested in digital photography and minerals. I was also interested in learning how to create a WEB site outside of my then corporate job. Since one of my hobbies was mineral collecting I decided to marry it to another hobby, photography. |
||
 |
My small collection of minerals was mainly thumbnails and small cabinet specimens. I began by using a live video camera that could focus within about 1". I decided more magnification was needed, so I purchased a Russian made microscope and began to adapt the camera to the scope. The original camera had a resolution of 512 x 492 pixels, and my then Macintosh 8100 AV could capture video in real time with its built-in video capture A/D card. The hardware and software captured still video images at 640x480 resolution. It did some interpolation in one direction. I discovered I could produce a final sharp image at 320 x 240 resolution from the captured originals. |
|
|
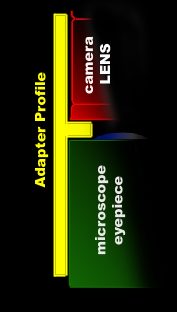
The video camera (from VideoLabs) came with a plastic coupling ring designed to attach it to most American microscopes. But mine was Russian and it did not fit. I used a wood lathe and enlarged the diameter of one opening until both the camera and the microscope eye piece fit snugly. My camera is now several years old and the new product specifications and characteristics have changed with their newer product lines, but they make a good product. The profile is shown in the figure above. And a photograph of the coupler is displayed below. It is a simple device and could be recreated from PVC tubing and a single in line fitting if desired. Adapting a microscope to a video camera does not have to be hard or expensive. It is sufficient to get the two lenses (the camera lens and the eyepiece lens) as close to alignment as possible, nad this can easily be accomplished with a little effort. I use electric tape to shim (or offset) either the camera lens or eyepiece as needed. Building up layers as needed to move the lens a tiny amount. |
||
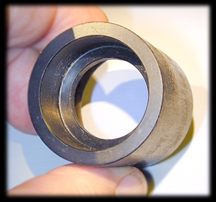 |
The lip (or flange) around the middle of the coupler is deigned to fit down on the edge of the eye piece without covering any of the lens elements (camera or microscope). It rests on the eyepiece and lets the camera's weight rest on the camera lens assembly. At first glance it might seem that this makes it tough to get at the circular focus ring on the camera lens. (It does!) But, you only focus once using the camera lens. Once the camera is mounted and the lens is adjusted (focused) to provide a clear view of the entire field, final focus is achieved using the microscope knobs and not the camera focusing mechanism. |
|
 |
 |
|
|
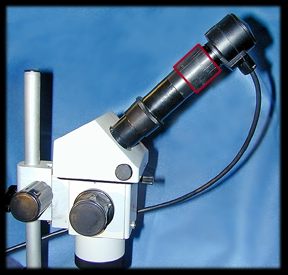
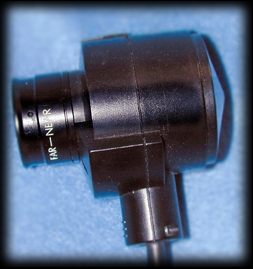
The coupler is outlined in red in the image to the upper left. Since my scope uses a 45 degree binocular adapter, it sits at the 45 degree position without any problems. I sometimes use a small strip of plastic electrical tape inside the coupler to tighten the two connections as needed to keep the camera from slowly slipping. The original camera is sown in the image to the upper right. The standard lens had no iris so there was no f-stop control and hence no depth of field control. Basically all of the mineral and gemstone images on this site that display at a resolution of 320x240 were taken with this set up. The work-up techniques described in the earlier pages (14-15-16) were originally developed using this camera system and have undergone only slight modification with my new camera set up. Although I still use this system for capturing live video images, it has since been replaced with my newer Nikon 950 camera and another home-made adapter. The old Macintosh 8100 AV was also replaced with a used Macintosh 8600 which has the same fundamental video capture system as the original 8100, only it has a much faster processor. (It was obtained from e-bay for less than $250 a few years ago.) You can pick one up on e-bay for about $100 today, and it still works well for still image capture from live video cameras. I use a Mac G4 now for final image work-up in Photoshop, but maintan the old 8600 for live video capture. Note: You can adapt many of the small security cameras to a microscope with little trouble. You need to look at the camera specifications, they come in color or black & white (and the higher resolution versions are often B&W), and they usually need a small separate power supply to operate them. Several companies make wireless transmitter systems that allow the camera to operate a some distance from the recorder (in my case a personal computer). Yes I have used these small transmitters and they do work, but they provide less than optimal image quality. One last point, all of these live video cameras need the computer to capture the image. Your computer must have a video A/D (capture card) in order to capture images. Be certain you understand the capture ability of your capture card before selecting a camera. I have seen some video cards that cannot capture more than 320 x 240 resolution, so they will not capture the best quality images from a camera that has higher resolution. You must match both the resolution of the camera and the resolution of your video capture card. |
||
|
|
|
|||