![]()


|
|
||||
|
|
||||
|
|
|
|||
|
Digital Photography -
Image Work UP |
||||||||
|
5.) I usually SHARPEN the image at his point. All digital photographs appear a little soft, and size reduction of the photo will cause additional softening. |
5.) Same procedure on the print image. |
|||||||
|
When a photo is reduced in size, the pixels are averaged (this acts like a mild blurring). It is very useful to sharpen an image in some way before doing a size reduction. If the image is sharpened after reduction (rather than before) the image may become grainy. The amount and kind of SHARPENING will depend on the image content. I may use a simple SHARPEN, A SHARPEN EDGES or the UNSHARP MASK filter. The UNSHARP MASK filter offers the most control, but I usually reserve it for use at the end. (Last step) The sharpening done at this time is highly moderated by the size reduction to come, and it is not necessary to worry about grain build up here. To the right is the histogram after it was modified in the previous step (histogram adjustment), and the one below it is of the SHARPENED image. Notice the SHARPENING fills in the gaps created by the original adjustment. Image size reduction would fill them in and smooth the histogram even more. The image to the left is the result after the sharpen filter is applied. |
||||||||
 |
  |
|||||||
|
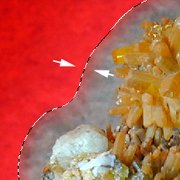
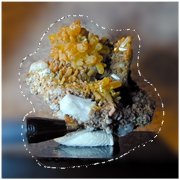
5a.) I also will select a portion of the background and run a GAUSSIAN BLUR on it at this time. |
5.a) There is no advantage other than an artistic choice to run a GAUSSIAN BLUR on the print image. It will compress better when saved, but it has no useful effect on the print. |
|||||||
|
The GAUSSIAN BLUR of the background is used to begin the optimisation for JPEG compression and use on the WEB. It will eventually reduce the image size by 10 or 20%. There is no particular advantage to blurring the background of the print image unless it is done just for artistic purposes or to draw attention to the mineral and remove interest in the background. I will not do it in this example so you can eventually see the final file size difference in the two images. The left most image shows the selection area. The center image shows the result of running a FEATHER of about 20 on the selection area. (The FEATHER creates a soft edge around the selection.) Then I run a GAUSSIAN BLUR on the selection area with the BLUR value set to a litle less than 1/2 of the feather value. (FEATHER = 20, then GAUSSIAN BLUR = 7). I run the blur several times to really soften the background information (usually about 5 or 7 times). |
||||||||
|
||||||||
 |
|
|||||||
|
|
|
|||||||
|
6.) Image size reduction: it is now time to reduce the image to the selected size for use on the WEB. I use the IMAGE SIZE... dialog box, |
6.) On the print image things change here. We must use a different method to secure the resolution we need. |
|||||||
|
|
|
|||||||
|
In the dialog box the most important function before resizing is the RESAMPLE IMAGE method. It needs to be set to either BICUBIC or BILINEAR, but NOT to NEAREST NEIGHBOR! It should be adjusted to either of these settings before any resize is done on the WEB or PRINT side. |
||||||||
|
I have decided I want a 400 pixel wide image for my use on the WEB. So I set the WIDTH to 400 in the above dialog box and leave the RESOLUTION alone. I then hit the OK button and continue, my image is now 400 x 416 @ 75 DPI (Remember 72 = 75 as far as we are concerned.) |
To obtain higher print density change the RESOLUTION setting to 150 DPI (or higher). Using all of the original pixels in the image maintains the best quality. Avoid enlarging! Change two things simultaneously to get this result. First set the RESOLUTION TO 150 DPI. This will make the other values change. So also reset the WIDTH back to 1077 (the original value). This will make the PRINT SIZE shrink to 1/2 of its original size, but it will have 2 times the density. |
|||||||
|
The WEB image has a resolution of 400 x 416 @ 72 DPI while the print image is now 7.18" x 7.473" @ 150 DPI . The print image appears not to have changed as far as the monitor is concerned. In the following comparison I also reduced the PRINT image to a total of 400 pixels in width, but the image is still at 150 DPI. Notice they are both the same size as far as the monitor is concerned, but the top one would print at twice the size with half of the resolution. The bottom one would print at 1/2 the top ones size, but with twice the resolution. |
||||||||
|
|
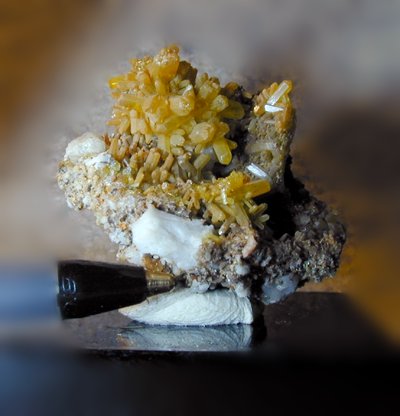
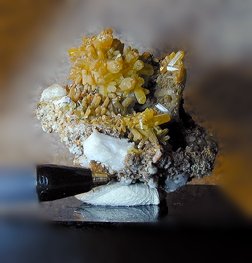
This is the WEB based image with the blurred background. It is: 400 x 416 @ 72 DPI or 400 x 416 = 166,400 total pixels. When saved to the JPEG format using a setting of 85 in the HSV software, the file size is 27,401 bytes. Note* this amount of file size reduction (as calculated below) is some what larger than most images will display. It is very dependent upon the level of detail or patterning in the background. This image has a strong, small pattern and the reduction worked very well. |
|
|
|
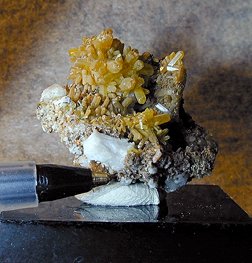
This is the PRINT based image with no blur in the background. It is: 400 x 416 @ 150 DPI so it has the same number of total pixels as the WEB based image. 400 x 416 = 166,400 After compressing it with the HSV JPEG software at a value of 85 it is 40,092 bytes in size. As the two images currently stand, there is nearly a 32% savings in the file size of the first image verses the second due to the background blurring. (27,401/40.092 )x100= 68.3 % or 32% smaller! |
|
|
|
|
|||