![]()


|
|
||||
|
|
||||
|
|
|
|||
|
Digital Photography
Compression |
|||||||||||||||||||||||||||||||||||||||||||||||||||||||||||||||||||
|
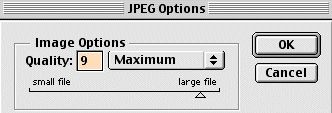
If not GIF then what? Well maybe JPEG (Joint Photographic Experts Group) is the right format for photographs, it has the right acronym! The JPEG compression method is a lossy method, and that means the decompressed file will not be exactly like the original, there will be some loss of information. The good news is that the user doing the compression can decide upon the level of compression desired. Anything from very high compression (very poor quality) to minimal compression (very high quality) can b e user selected. Since there is some degree of user control, it is very useful to understand what happens during the compression process. It is not necessary to understand the math, but by delving a little under the hood we may be able to aid ourselves when using the JPEG method. You can optimise a JPEG image before compression so that the compression engine does a better (more efficient) job. JPEG uses the Discrete Cosine Transform algorithm. (I thought you said we don't need to look at the math!) We don't , but it it very useful to know that the DCT method (Discrete Cosine Transform) is an area function that works on an 8 pixel by 8 pixel area. We will come back to this fact a little later. In theory the method could produce a lossless image, but in actual practice it uses real numbers and some cannot be written exactly. (For example 1/3, or 0.33333333 ... etc. etc.) So some loss always occurs. Besides as you increase the quality of the compression, the amount of compression decreases. The trick is to find the point that represents good compression with acceptable loss. The various programs that do JPEG compression are not required to use exactly the same methods, nor are their controls numerically equal. You must learn any system you decide to use. The written format is standardized so a single decompression routine always works, but the way to compress to final format may be slightly different from one product to another. Typically user control is provided in one of two ways: 1.) a scaled value that represents the quality of the final result, or 2.) a scaled value that represents the amount of compression. Since they work in opposite directions you should not confuse them. Below is an example taken directly from Photoshop. Figure 1. |
|||||||||||||||||||||||||||||||||||||||||||||||||||||||||||||||||||
|
|
This is the standard dialog inside of Photoshop that is displayed after the SAVE AS... has been executed with JPEG as the file type. It asks you to select the IMAGE QUALITY, where high numbers mean more quality and hence less compression. |
||||||||||||||||||||||||||||||||||||||||||||||||||||||||||||||||||
|
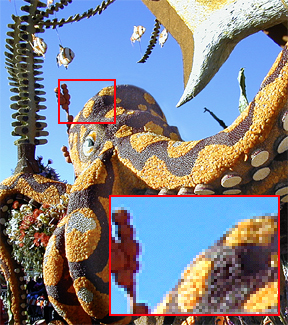
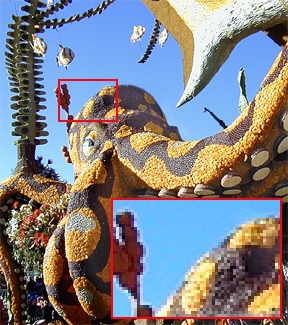
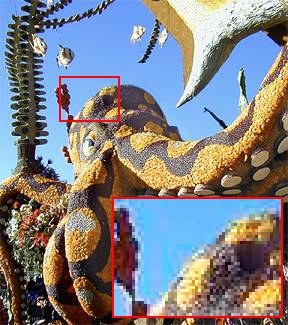
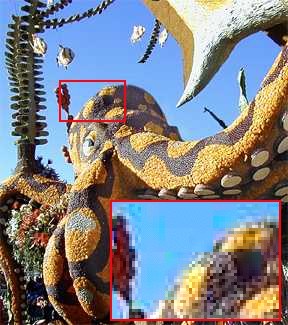
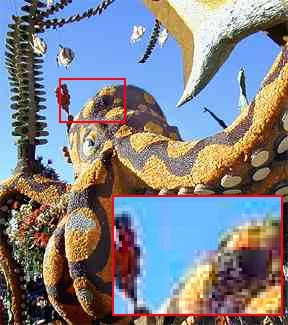
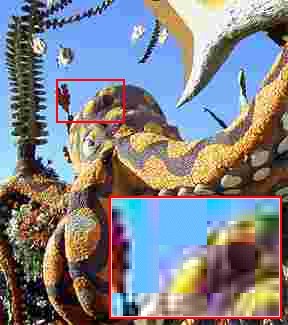
You may select values from one to ten, with 1 being the most compression, worst quality. So now we have to ask the question ... how do I find the right compression level? We must study some photographs and look for hints. Remember that DCT method and the 8 by 8 area. We can use this little bit of knowledge to search and determine the quality of compression. You should note here that compression will be affected to some degree by the content of the photo. For now I have selected one which will easily show the artefacts created using DCT compression. The original image for this series was 399,422 bytes (about 400K) in size uncompressed. Each image below has a little table below it and the data can be explained as fllows ...
Second Column - The size in bytes of the compressed file. Third Column - the ratio of compression based on column two and the original image. |
|||||||||||||||||||||||||||||||||||||||||||||||||||||||||||||||||||
|
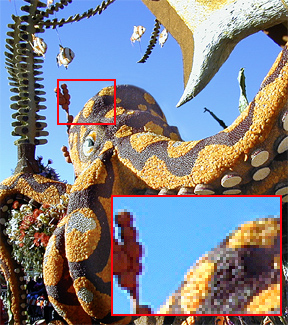
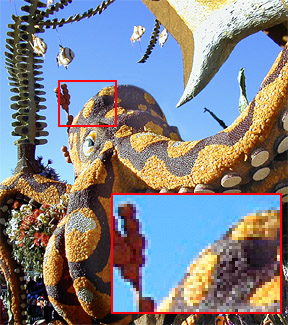
The left column of photos was created using the built-in JPEG compression in Photoshop that has a scale from 0 to 10. The right hand column was create with HVS JPEG 2.0, and it uses a scale from 0 to 100. In each case the higher number means better quality (less compression). Look at HVS-10 verses Photo-1, and you can see what I indicated earlier, the fact that both are set at roughly 90% of scale produces drastically different compression ratios. ( 18.1 : 1 vs. 8 : 1) The closeup box in the lower corner of each image reveals the level of noise that is present after the decompression. This image was selected because it is high contrast and has areas of quick change. The noise level is intensified in areas where there is a step change. |
||||||||||||||||||||||||||||||||||||||||||||||||||||||||||||||||||
|
Look closely at HVS-10 and the closeup box, you can see the 8x8 pixel areas that the JPEG is working on. This is what causes the noise around step changes in intensity. The DCT function works in these small blocks and optimises them for compression without any regard for the adjacent areas. this is he nature of noise in JPEG compression. It is really easy to see the 8x8 pixel areas in the close-up box, the outline of the 8x8 areas stands out at this high compression (low quality) setting. Since the DCT method does not take into account adjacent areas, the well defined differences and problems often appear strongly where the image changes contrast rapidly. Notice that the blue areas above the rapid change areas appear less defined, but those with rapid change have strong 8x8 box characteristics. Here are some
summarised generalisations about JPEG
compression 1.)
Compression
up to about 3 : 1 is nearly lossless 2.) Compression
from about 4:1 to 10:1 is very good and is useful
for virtually any image on the WEB 3.) Compression
from 10 :1 to about 15:1 is marginal but may be
useful in some situations 4.) Compressions
of 15 :1 and higher are noticeably damaging to the
image 5.) Compression
is dependent up on the image content, a very busy
image (like an autumn picture with a hillside of
colored leaves) can be compressed more than clean
images with well defined boundaries. 6.) There are
ways to optimise an image BEFORE it is compressed
to produce better compression and maintain higher
quality after decompression. These will be
demonstrated in the next pages ... |
|||||||||||||||||||||||||||||||||||||||||||||||||||||||||||||||||||
|
|
|
|||