Step by Step - continued 2
11.) Time to Polish the pavilion Facets
Based on the type of material you are cutting choose a polishing system.
There are no RIGHT or WRONG answers at this step, there are simply things that work and things that don't work!
Some "Guidelines for Polish";
very hard materials and most synthetics polish well with diamond on a ceramic lap. (Exception to this is Cubic Zirconia.) Some beryl minerals (notably those with many flaws may need a softer lap.)
Cubic Zirconia polishes extremely well on on a Raytec "Fast Lap" with 50,000 or 100,000 mesh diamond spray.
Quartz and other "medium hard" stones polish well using Spectra Ultra Laps - polymer disks.
|
Ceramic Lap + Diamond |
corundum, spinel, (real or synthetic), topaz, beryl, tourmaline, iolite, andalusite |
|
Fast Lap + Diamond |
CZ, Garnet |
|
Ultra Lap |
Quartz, orthoclase |
Now for the "TRUTH" - finally you say! There is no "Correct Answer" for polishing, or there are as many "Right-Answers" as there are faceters. Everyone must eventually discover for themselves their own BEST METHOD to achieving a good polish. I feel it may be a function of the particular machine you use, the amount of pressure that you personally apply, perhaps the quality of water in your area, and who you get your polishing compound from.
Some people use vinegar to make the coolant more acidic, others never use water only light oils, some add detergent to the coolant, some claim hard water works best ... hum maybe combining all would lead to the use of a nice home made vinaigrette dressing made with hard water. Well it's a thought!
Polishing some materials may be more of an art than a science. For me I could never get a polish on quartz using a ceramic lap, hence I quit cutting for a number of yeas as I found it too frustrating. Then some one mentioned that quartz polished well on the Ultra lap. I drug out my machine and tried it ... low and behold I got very satisfactory results and started faceting again.
I was having trouble with CZ on a ceramic lap, and the Ultra Lap was too slow. I killed about 3 stones then gave up on CZ. I then decided to run my own "Harris Pool" over several months and asked many really good faceters I got back several answers, but mostly ... "I get good results with a Fast Lap with diamond". The democracy worked, so now I polish with a Fast Lap and diamond for CZ. (I am satisfied with my CZ now.)
The interesting thing about polishing is that what works well for one person may not work well for another. It is often a matter of trial and error. It is always good to listen to what any one person is doing, but look to a group for trends or starting points that are more universal solutions.
OK enough said. For my current quartz project we will use an Ultra Lap mounted to the back of a worn out metal lap.

Place the Ultra Lap on a base lap and use the nut to tighten the two laps together. I use some water droplets on the surface of the lower metal lap to create a tighter fit.
Use a steady supply of coolant (water) as you polish each of the facets. Once each of the 8 facets are polished, you have finished the Pavilion!
12.) Transfer the stone from the pavilion DOP to the culet DOP.
This step requires a "Transfer Block" which is illustrated to the left. It is simply a milled piece of metal that has a grove cut in one surface. This grove allows two DOP sticks to be precisely aligned.
The DOP with the polish pavilion is placed on one side and a second DOP is placed on the other side. The second DOP has a conical depression that will allow the facet end of the stone to rest within while providing support on the DOP shoulder.
Examine the first image in the set below left, here is a DOP with the conical depression for a round cut stone.
The tip of the newly polish pavilion will be placed into the depression as in the second image. Before we make this fit we will fill the conical depression with 5 minute Epoxy just as we did with the first DOP. You would like to have the stone securely seated at all points around the edge of the facets.
As the stone is slid into the second DOP it is place in the TRANSFER JIG to be certain that the alignment is proper. Excess Epoxy is used t form a more stable base as we did on the first DOP. It is smoothed up to , but not over the girdle. It is necessary to not cover all the facet tops with the cement. Some must be visible to aid in the indexing after the transfer is complete. (See final image in series.)
13.) Once the second Epoxy joint has hardened it is time to separate the DOPs.
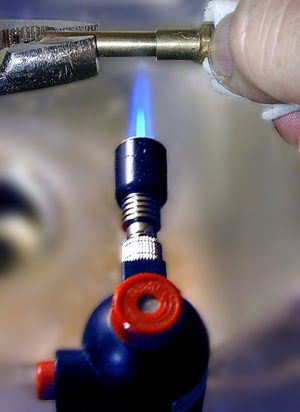
I take the cemented pair of DOPs and stone from the transfer block, I wrap the end I wish to keep intact (the newly cemented end) with a WET (WET not damp) paper towel.
Much of the paper towel is wrapped and in contact with the stone itself (not just the DOP!) You want as much of the heat as possible transferred to the water and not the stone. I hold the old DOP, with a pair of pliers as it is going to get quite HOT.
I use a propane burner tip on a mini torch and bring the flame to a point. I direct the flame at the old DOP and begin to apply pressure in an outward direction (away from the flame) using the pliers and my hand.
Using my hand on one side also serves a second purpose, if it starts to get too hot, then maybe the stone is getting too hot.
Usually within about 10-20 seconds the pair separates leaving me with a newly DOPed stone and the old DOP.
And here is the final product a successfully transferred stone form one DOP to the other. We are now ready to begin cutting the CROWN of the stone.