Step by Step
1.) Decide on the material to cut
Let's say we are gong to do a piece of citrine.
2.) Decide what type of cut you wish to do, and let the stone's rough geometry aid in the process.
We are going to do the very simple eight sided cut with a total of only 17 facets. It is called the "Eight Cut" and was probably first cut in the middle 1300's.
3.) Obtain or create a diagram and modify the angles for the material selected in step 1. Critical Angle for Quartz is 40 °(degrees). Cutting Angles (Literature) Culet = 43°, Crown= 42°.
|
|
|
|
|
|
|
PAVILION: eight-fold symmetry, 96 gear, using the asterisk settings |
CROWN: using the same settings as the pavilion. Transfer match at ID setting. |
|
1.) eight mains (M) at culet angle; 12-24-36-48-60-72-96 |
1.) eight mains (M) at crown angle; 12-24-36-48-60-72-96 |
|
POLISH: all facets |
2.) cut TABLE at 0° to a width of about 50% |
|
POLISH 1-2 |
|
4.) Examine the rough material and decide if there are any important factors to consider before choosing the TABLE.
Sometimes the shape of he rough piece will automatically help you determine the best TABLE position, Sometimes, there is color zoning in the rough that must be oriented. Sometimes, the table must be placed some degrees from a cleavage plane.
You can use REFRACTIVE INDEX solution to aid in examining the interior of the stone for color banding or flaws.
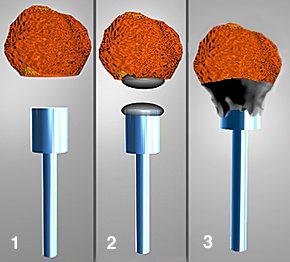
One you have selected the best orientation for the TABLE, use your rough wheel and grind a flat (by hand is sufficient) where it will be. mafe it large enough so the DOP is entirely covered.
5.) DOP the stone.
Get a dop stick of the correct diameter and use an adhesive to affix the flat side (created in 4 above) of the stone to the DOP.
The adhesive should provide additional support to the back of the stone. I usually make a small dam around the DOP so that when hard it reinforces the stone.
1.) Prepare (clean the surfaces)
2.) Put the adhesive on both surfaces and mound it slightly.
3.) Bring the two pieces together and center the rough over the DOP. Either clamp or allow the joined pair to sit undisturbed until the adhesive sets up.
The rough must extend beyond the DOP on all sides and should be as close to center as possible.
For most non-heat sensitive stones I use Quick Set or 5 Minute Epoxy to DOP the stone. I let it dry at least 30 -60 minutes before use. It is important to error on the side of additional hardener if the 1:1 mix is missed. Less hardener can produce a soft bond that will allow the stone to move under pressure.
6.) Put the DOP in the Facet Machine's head and lock it in place. Set the angle to 90° and begin to round the outside shape of the rough.
In this step you will create the girdle line for a round stone. Fundamentally you are going to create a cylindrical shape that is equidistant from the center of the DOP.
The closer to perfection you get this, the easier all subsequent steps will be.
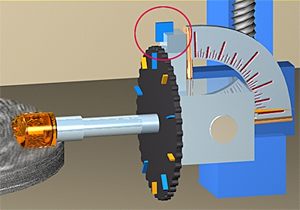
The closer to perfection you get this, the easier all subsequent steps will be. Here you unlock the Index Gear (red circle at right) and let the DOP run freely while cutting the rough to size. I use my finger as a break along the DOP to control the spinning and cutting speed.
You are finished when the rough has achieved a perfect cylindrical shape and there are no longer any high or low spots in the cylinder. Be careful not to cut into the DOP. If you do cut into the dop, then you did not properly center the rough when you applied and dried the adhesive.
Start with your roughest lap (100-180 grit) and when you have just about achieved the desired result, switch to a medium lap (220-260 grit) and continue until everything is round.
Also remember to use plenty of coolant (water) when cutting at his step as you will be removing a good deal of material rather quickly.
Note* = The gear used in these and the upcoming illustrations is not a 96 index as specified in Step 3 above. I am aware of this, but decided the teeth looked too small in the diagrams if I used a 96 index gear.